
DTF Prints 5 Proven Methods for Proper Curing & Durability
Table of Contents
Introduction to DTF Curing
DTF Prints have become popular because they are flexible, colorful, and work on almost any fabric. But printing is only half the job. The real strength of DTF Prints comes from proper curing.
Many beginners think curing just means “heating the print.” That’s not true. Curing is about bonding the ink and adhesive powder correctly so the print lasts through washes and daily wear.
If curing is done wrong, DTF Prints may crack, peel, or fade quickly. In this guide, you will learn practical and proven ways to cure DTF Prints properly, using simple tools and clear steps.
Why Proper Curing Matters
Curing decides the life of your DTF Prints.
When cured correctly:
- Prints stretch with the fabric
- Colors stay bright
- Wash resistance improves
- The design feels smooth
When curing is poor:
- Prints peel after washing
- Edges lift
- Ink cracks
- Customers complain
Think of curing like cooking food. Undercooked food is unsafe. Overcooked food is ruined. DTF Prints need the same balance.
According to insights shared by FESPA and PrintIndustry.com, correct curing temperature and time are the main factors that decide print durability.
Preparation Before Curing
Before curing DTF Prints, preparation is very important.
Check Adhesive Powder
The adhesive powder must be:
- Evenly spread
- Not clumped
- Fully melted during curing
If powder coverage is uneven, bonding will be weak.
Dry the Printed Film
Let the printed film rest for 3–5 minutes before curing. This allows the ink to settle properly.
Use Quality Materials
Good film, ink, and powder make curing easier. Many printers prefer reliable supplies like DTF PET Film Roll – Hot Peel from because it handles heat evenly and peels clean.
Curing Methods
There are three common ways to cure DTF Prints. Each has its own use.
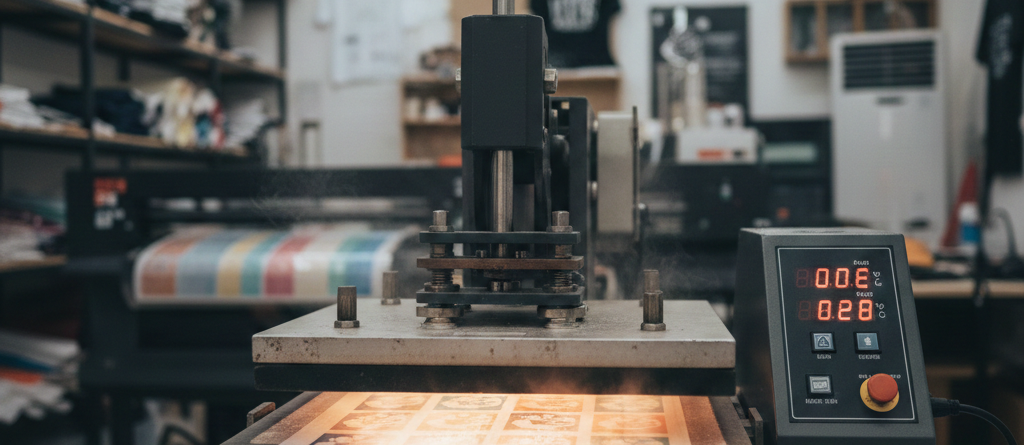
Heat Press Technique
This is the most popular and reliable method.
How It Works
A heat press applies controlled heat and light pressure, melting the adhesive powder evenly.
Steps
- Set heat press to 130–150°C
- Place the printed film on the press
- Hover or close with light pressure
- Cure for 10–15 seconds
Many professionals use Automatic Heat Press Machine from DTFshop.in for consistent results.
Why It’s Preferred
- Even heat distribution
- Less risk of burning
- Repeatable results
Heat press curing is ideal for bulk production of DTF Prints.

Oven Curing Process
Oven curing is useful when you don’t have a heat press.
How It Works
Printed films are placed inside a curing oven or modified convection oven.
Steps
- Preheat oven to 130–140°C
- Place films flat on tray
- Cure for 3–5 minutes
- Watch closely to avoid overheating
This method works well with stable films like Premium DTF Transfer Film Sheet.
Things to Remember
- Never use food ovens
- Heat must be evenly spread
- Rotate trays if needed
Oven curing is commonly used in small workshops.

Heat Gun Method
Heat guns are mostly used for samples or small jobs.
How It Works
Hot air melts the adhesive powder manually.
Steps
- Set heat gun to medium heat
- Move continuously over the print
- Stop once powder turns glossy
A simple tool like Industrial Heat Gun can help beginners test DTF Prints.
Limitations
- Uneven curing risk
- Time-consuming
- Not ideal for production
Heat guns are good for learning but not for large volumes.
Optimal Settings (Temperature & Time)
Correct settings are the backbone of strong DTF Prints.
General Guidelines
- Temperature: 130–150°C
- Time: 10–15 seconds (heat press)
- Oven time: 3–5 minutes
Always follow powder manufacturer guidelines. Products like DTF Hot Melt Adhesive Powder usually come with recommended curing ranges.
Signs of Proper Curing
- Powder melts evenly
- Print surface looks smooth
- No grainy texture
If powder still looks rough, curing is incomplete.

Post-Curing Steps
After curing, let the film cool naturally for 5–10 seconds.
Peeling the Film
Depending on film type:
- Hot peel: Peel immediately
- Cold peel: Wait until fully cool
Rushing this step can damage DTF Prints.
Second Press (Optional)
A second press with parchment paper for 5 seconds improves softness and durability.
Testing for Durability
Always test DTF Prints before selling.
Stretch Test
Stretch fabric gently. The print should stretch without cracking.
Wash Test
Wash after 24 hours:
- Cold water
- Mild detergent
- Inside out
Well-cured DTF Prints survive 30+ washes easily.
Common Mistakes to Avoid
Many issues come from small mistakes.
❌ Too much heat – burns adhesive
❌ Low heat – weak bonding
❌ Uneven powder application
❌ Rushing the peel
❌ Using poor-quality film
Experts at InkJetInsights.com often highlight that inconsistent heat is the #1 cause of DTF failure.
Tips for Long-Lasting Prints
- Always pre-test new materials
- Clean heat press plates regularly
- Store powder in dry place
- Use parchment paper during pressing
- Follow proper washing instructions
Small habits make a big difference in DTF Prints quality.
Product Suggestions (Blue Color)
- DTF PET Film Roll – Hot Peel
- Premium DTF Transfer Film Sheet
- DTF Hot Melt Adhesive Powder
- Automatic Heat Press Machine
- Industrial Heat Gun
(Products referenced naturally for process understanding.)
External References + Credits
Helpful resources:
- PrintIndustry.com – DTF curing best practices
- Fespa.com – Textile printing standards
- InkJetInsights.com – Technical ink behavior
Credit: Information references from Fespa, PrintIndustry, and other public sources.
LEAVE A COMMENT